Modding discussion for Driver.
User avatar
By someone972
Registration Days Posts Posts Posts Avatar
#47193
Formerly known as the Driver Car Importer, I have now released the current source code of the Driver Level Editor on github. You can find it here: http://github.com/someone972/driver-level-editor The name change is to future-proof it in the event that I add more functionality than just importing textures and cars. I'll push updates whenever I change something so it will always be up to date. Feel free to take a look and maybe even contribute if you know C++/Qt. This does not include the executable, so you'll need a pretty good knowledge of compiling Qt apps to build it.
User avatar
By someone972
Registration Days Posts Posts Posts Avatar
#47199
I will make compiled releases for points when it is working correctly, but until I get texture moving working I think that I'll hold off for now. If people want to get into development or something I can help them get it compiling.
#47201
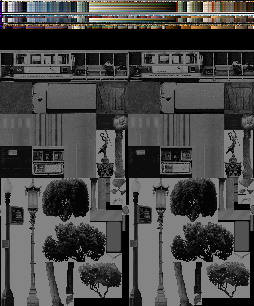
It's been quite an amazing 3 years (going on 4!), I remember the very first image extracted from DRIVER just as if it were yesterday.
someone972 wrote: Image
There it is. This is greyscale since I am only using one byte out of the 4-byte pixel.
And there I was...FIRST! :P
CarLuver69 wrote:DUDE, You are the first person to EVER, and i mean EVER get any texture out of Driver. You are truly amazing. TRULY AMAZING!

We need people like you to help crack Driver! I love you..no homo
^^^ What a weird kid, who would ever...nevermind.

Sweet, sweet color.
someone972 wrote:Now don't get too exicted (because there is still a lot to do before having a truely functional texture editor), but I got the textures out in color. Sweet, sweet color. :D

Here is a sample:
Image
And now look where you are. 3 years later and we've imported textures, models, ripped apart DRIVER as much as possible, and now we wait for the intensive modding to initiate. Impressive!
User avatar
By someone972
Registration Days Posts Posts Posts Avatar
#47876
This is the first part of a few small tutorials on how to get the source code (and possibly compile it).

Getting the source code

There are two avenues you can take when downloading the source code. The first would be to use GitHub's "Download as Zip" button on the project's homepage. This is probably the easiest way to get the source code. The second option is to install git and download the source by cloning the repository. A nice choice for windows is TortoiseGit which provides a graphical interface as well as the option to add the git command to the command prompt. The benefit of this method is that getting the newest code is just a simple command which can even be integrated into a batch file.

Downloading the source using the command prompt and git

Create a new folder where you want to download the source code to, either using the mkdir command or by creating one in Explorer. Open a command prompt and navigate to your newly created folder using the cd command. Once in the folder, enter 'git clone https://github.com/someone972/driver-level-editor.git'. If all goes well it should create a folder called driver-level-editor. you can then enter this folder and use the 'git pull' command to get updates. To make this process easy, you may wish to create a batch file in the driver-level-editor folder called update.bat or similar. Enter the following:
Code: Select all
git pull
PAUSE
You can now just run the batch file instead of having to open a command prompt every time.

Downloading the source using TortoiseGit's GUI

This assumes that you allowed shell extensions when installing TortoiseGit. Create a new folder where you want to download the files to. Then right-click the folder and select "Git Clone...". A dialog box should pop up; enter 'https://github.com/someone972/driver-level-editor.git' into the URL field. If 'Load putty key' is checked, uncheck it. Once you click OK the download should begin, and hopefully will not have any errors. To get updates, right click on the driver-level-editor folder and navigate to the TortoiseGit sub-menu and select pull. Click OK on the dialog box that appears and it should get the newest versions of the files, or inform you that they are up to date.

Compiling the source

There are a few things you will need in order to compile the source. FINISH ME

Setting up Code::Blocks

Start by downloading Code::Blocks 12.11 bundled with MinGW (codeblocks-12.11mingw-setup.exe) from here. If you already have a compiler installed you can download the version without MinGW instead, so long as your compiler is up to date.

Getting Qt5

Compiling Qt5

Getting FreeImage
Download the precompiled FreeImage DLL from the following link: http://freeimage.sourceforge.net/download.html After extracting the file you should have a folder 'FreeImage' with a 'dist' folder inside. Copy the 'FreeImage' folder to the location of your choice (I generally like to put it in the Code::Blocks directory).

Setting up Environment Variables in Code::Blocks
Before you can compile the DLE, you need to set up some environment variables in Code::Blocks telling it where to look for Qt and FreeImage. Select Settings->Environment and scroll down to the environment variables section. There are three variables you must add in order for DLE to compile:
  • QTDIR - Set this to the folder where Qt is installed. The folder you select should have a folder called 'bin' inside of it, with qmake.exe inside of that.
  • FREEIMAGE_INCLUDE_DIR - Set this to the folder that contains FreeImage.h. This will probably be the 'dist' folder if you downloaded the binary release.
  • FREEIMAGE_LIB_DIR - Set this to the folder that contains FreeImage.lib. This may be the same as FREEIMAGE_INCLUDE_DIR.
Compiling the Driver Level Editor
If everything is set up properly then you should be able to compile the DLE by selecting either 'debug' or 'release' and selecting Build from the Build menu. By default the project is set up to output the executable and object files in a directory called 'DCI_nosync' which should be in the same folder as the main source folder. It is formatted this way so that if you are syncing the source folders between multiple computers using SugarSync or the like, it will not waste time uploading the exe.
By hemi
Registration Days Posts
#57145
Did any one of you face this issue:
"Driver Level Editor Unable to create temporary file"

i have tried to import other cars, but every time i ended by this message: "Driver Level Editor Unable to create temporary file"
any solution please ?
User avatar
By someone972
Registration Days Posts Posts Posts Avatar
#57146
Try running it as an administrator, or if you are unable to do that, copy the levels folder to a place where you are allowed to write to and save it there, then copy it over to the actual levels folder afterwards.
By hemi
Registration Days Posts
#57148
Hi someone972, i really appreciate your hard work man

however, i tried what you told me to do, but no luck :(

First, i took the level file to the desktop, then I run the DLE as an administrator,

then, i opened the lev and d3d as shown below:
Image

then, I import a car ..
Image

then, I choose Save As:
Image

I press "Save Selected":
Image


then the 2 errors comes out as below:
level:
Image

d3d:
Image

=====

since then, i am trying to figure it out but i could not
User avatar
By someone972
Registration Days Posts Posts Posts Avatar
#57209
To be honest I really don't know whats wrong. It's obviously having trouble creating the temporary file which gets written to when you are saving. Essentially how it works is it creates a new file in the same directory as where you are saving, writes the level to it, deletes the old file, and renames the temp file to the original file's filename. So the only advice I can give is to make sure you are saving into a directory which you definitely have write access to. If you're on Windows 8, maybe try changing compatibility settings.
By hemi
Registration Days Posts
#57238
someone972 wrote:To be honest I really don't know whats wrong. It's obviously having trouble creating the temporary file which gets written to when you are saving. Essentially how it works is it creates a new file in the same directory as where you are saving, writes the level to it, deletes the old file, and renames the temp file to the original file's filename. So the only advice I can give is to make sure you are saving into a directory which you definitely have write access to. If you're on Windows 8, maybe try changing compatibility settings.
thanks 972,
i will do my best to solve this issue. Maybe next time i will try from other pc/laptop and will see
Crazy Copper Frenzy

https://youtu.be/xAE3QsULyB4

https://youtu.be/AxdGf3F0yIg

Driv3r "Nice Getaway"

https://youtu.be/CYkmGAPoO9s Lucas in Driv3r's Ni[…]

https://youtu.be/Yvc_xKrKhnc?si=k4I5kraarTXctHJp […]